Table of Contents
Understanding the Purpose and Importance of Shipping Container Ventilators
Shipping container ventilators serve the crucial role of allowing controlled airflow into and out of the container. By doing this, they help reduce the accumulation of moisture, which is a common problem, especially in sealed environments. Without proper ventilation, condensation can occur inside the container, leading to problems like mold, mildew, and rust. This can damage the cargo and the container’s interior structure. Ventilators help maintain a balanced humidity level, preventing these issues and ensuring the cargo remains in optimal condition.


What is Container Condensation?
Container condensation, often called “container rain” or “sweating,” occurs when moisture inside a shipping container turns into water droplets. This happens due to temperature changes between day and night. Warm, moist air inside the container cools down as temperatures drop, causing the moisture to condense on cooler surfaces like the container walls or roof.
This can be a problem because those water droplets might fall onto the cargo, potentially causing damage like mold, rust, or warping. To prevent condensation, shippers often use desiccants (moisture-absorbing materials) or ensure proper ventilation inside the container. Packing dry goods and maintaining a consistent temperature can also help reduce the risk.
Where are ventilators placed in a shipping container, and how many container vents are typically available?
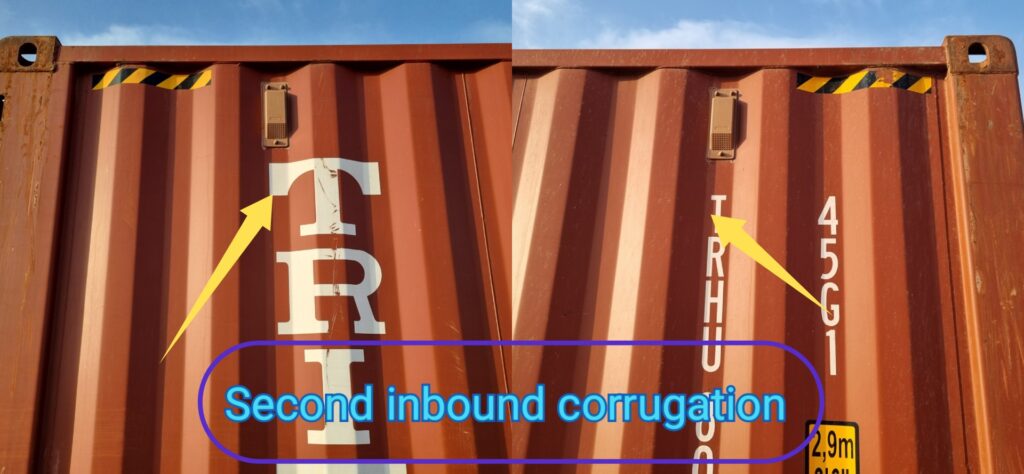
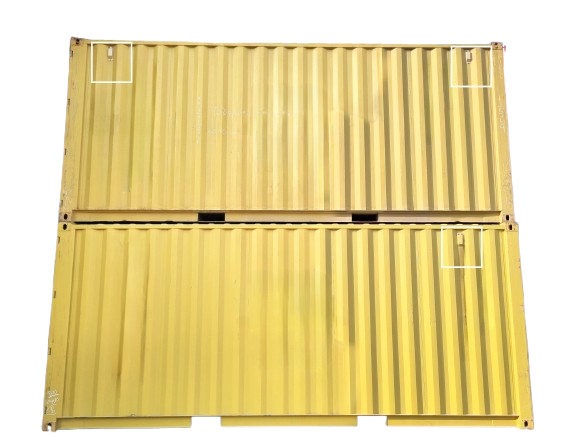
Shipping container ventilators are small components designed to allow airflow while protecting the container from water entry. They consist of a plastic or steel cover that’s about 25 mm (1 inch) deep. This cover is placed over a section of the container’s side panel, generally on the second inboard corrugation from the corner post (either front or rear). Here, several small holes have been drilled to allow air to move between the inside and outside of the container, promoting ventilation. The ventilator also includes horizontal ridges, called “baffles,” which help circulate air while blocking water from entering the container, keeping the contents safe from moisture.
Ventilators are typically placed near the top of the side walls, just below the roofline, to ensure proper airflow while maintaining the container’s structural integrity. Standard shipping containers usually have 2 to 4 ventilators, depending on the container’s size and design. The number of ventilators may vary based on the manufacturer and the specific needs of the cargo.
01. Single ventilator on side panel

02. Double ventilators on side panel

03. More than three ventilators on side panel

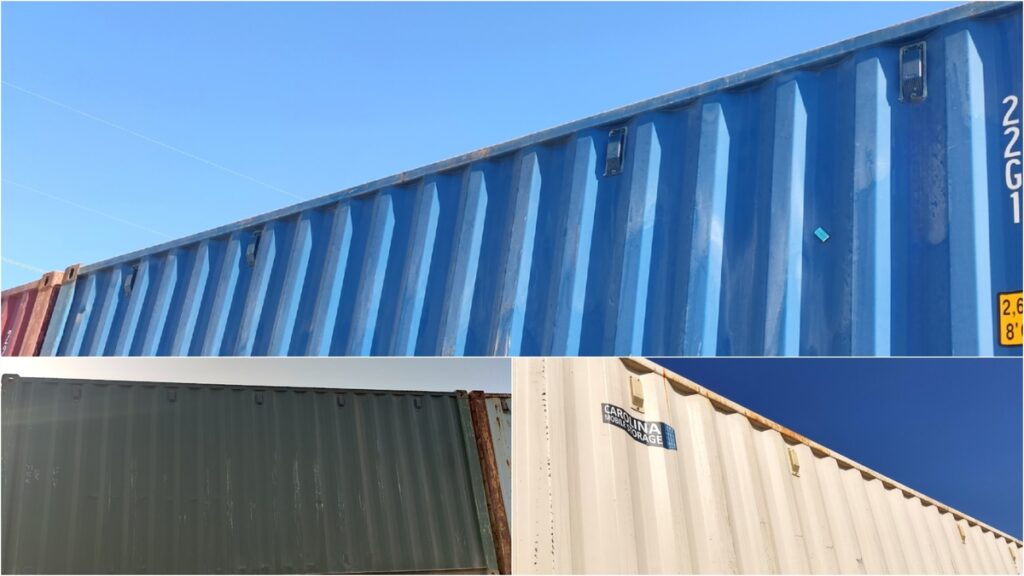
04. 20’feet Container ventilator placement
What are the Two Principal Sizes of Ventilators and How are they made ?
The two principal sizes of shipping container ventilators are wide ventilators and narrow ventilators.
01. Wide Ventilators
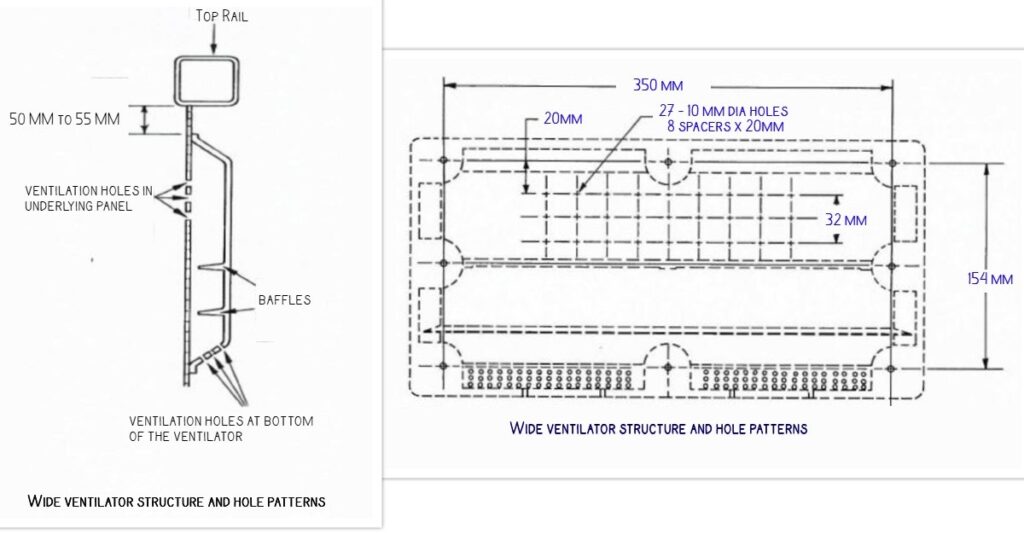
The wide ventilator, which measures approximately 350 x 150 mm. These wide ventilators are attached to the container using eight fasteners, ensuring a secure and sturdy fit. This size is often chosen when a larger airflow is needed to maintain proper ventilation.
02. Narrow Ventilators
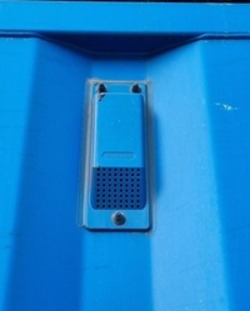
The narrow ventilator, measuring around 200 x 50 mm. These smaller ventilators are typically attached with three fasteners. They are suitable for situations where a more discreet and minimal ventilation solution is required.
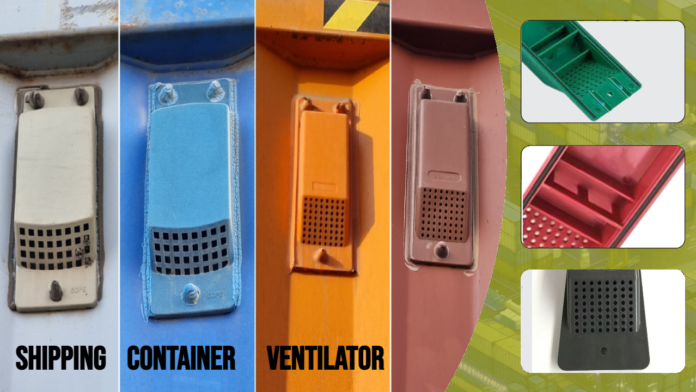
Both types are commonly made from a durable plastic material known as ABS plastic. This material is favored for its strength, resistance to weather conditions, and lightweight properties, making it ideal for the harsh environments containers face during shipping. The ventilators are usually designed to be UV-resistant and weatherproof, ensuring they maintain their integrity even under extreme temperatures and moisture.
Different designs of ventilators

What is ABS Plastic
ABS (Acrylonitrile Butadiene Styrene) is a type of thermoplastic polymer known for its durability, strength, and resistance to impact. It’s widely used in manufacturing due to its ability to withstand harsh conditions while remaining lightweight. The material combines three components:
- Acrylonitrile: Provides chemical resistance and heat stability.
- Butadiene: Adds toughness and impact resistance.
- Styrene: Contributes to a shiny, smooth surface and makes the material easy to mold.
ABS plastic is favored for shipping container ventilators because it’s strong enough to handle temperature fluctuations, UV exposure, and rough handling during shipping. This makes it a reliable choice for components that need to last in demanding outdoor environments.
Know about Ventilator & Ventilator hole patterns of Shipping Container ?
Wide ventilator structure and hole patterns
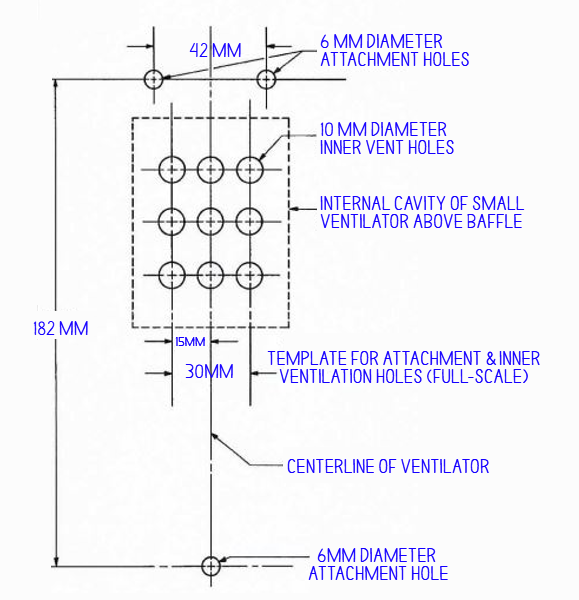
Hole pattern on panel under narrow plastic ventilator
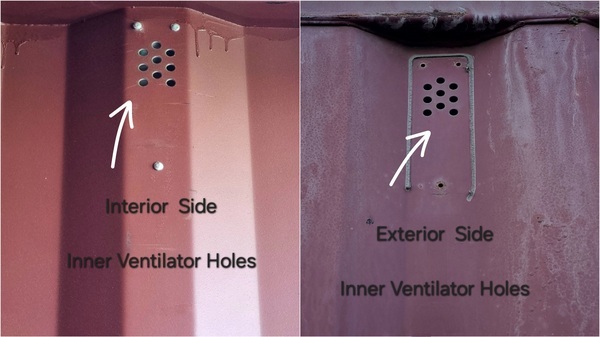
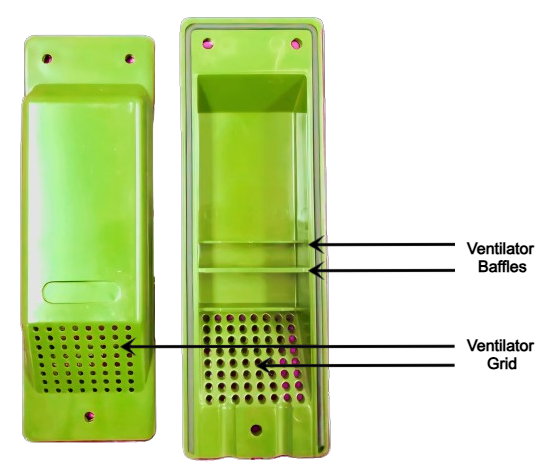
Ventilator Assembly
ISO CEDEX Code – VRA
A device securely affixed to the side panel of a container, designed to allow air exchange with the surrounding environment.
Ventilator Baffle
ISO CEDEX Code – VRB
An internal barrier within the ventilator that blocks seawater from entering.
Ventilator Cover
ISO CEDEX Code – VRR
The outermost part of the ventilator, forming a section of the container’s exterior.
Ventilator Grid
ISO CEDEX Code – VRG
The lower section of the ventilator, either perforated with holes or built with mesh to enable airflow.
What damages can occur to ventilators that require necessary actions to repair ?
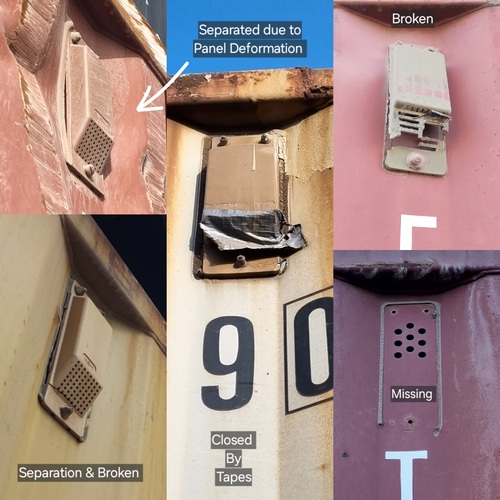
1. Ventilator Missing
2. Ventilator Cut or Torn
3. Ventilator Separation due to Loose Fasteners or Missing Fasteners
4. Any Separation due to side side panel deformation
5. Ventilator is closed by tapes
How to Repair Shipping Container Ventilators
Missing – Install new Ventilator
Cut or Torn – Replace Ventilator
Separation due to loose fasteners – Refasten Ventilator
Any Separation due to side side panel deformation – Repair Side Panel and refasten Ventilator
Closed by tapes – Remove Tape
What are the steps of Installing Container Ventilators ? (Repair Procedures)
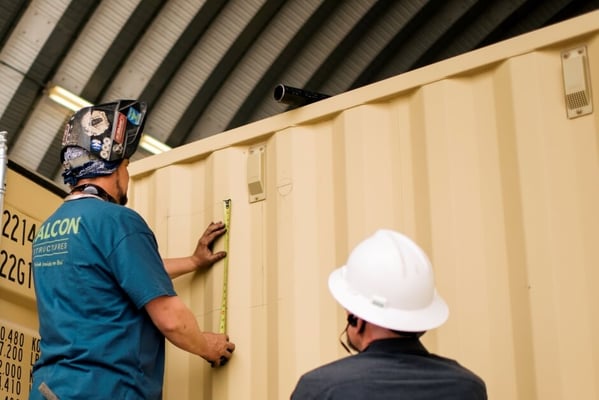
Newer containers are generally equipped with plastic ventilators instead of steel. Most containers are fitted with narrow plastic ventilators; therefore, this article will not cover repairs for steel or wide ventilators; However, the following outlines three scenarios in which a ventilator can be repaired or repositioned about narrow ventilators, along with the necessary steps:
Replacement of Damage or Missing Ventilators
- Remove the damaged ventilator (vent cover) and any existing fasteners.
- If the container vent is missing, remove the existing fasteners.
- Reposition the new ventilator, install the locking bolt collar, and secure it through the existing attachment holes.
- Apply a bead of sealant along the top and sides of the ventilator flange, leaving the bottom unsealed for drainage
Replacement of Steel or Other Container Ventilators with Narrow Plastic Ventilators
- Plug weld all existing ventilation and attachment holes.
- Position the replacement ventilator 50-55 mm below the side top rail (per IICL standards).
- Place the narrow ventilator in the second inboard corrugation from the corner post.
- Drill three 6 mm diameter attachment holes through the ventilator flange and the underlying panel, using the pilot hole and attachment location marks on the ventilator as a guide.
- Punch the centers for nine ventilations holes’ in the panel, then drill nine holes, each 10 mm in diameter, at the center punch marks.
- Insert and hammer in the three TIR-approved lock bolts into the attachment holes, with the bolt heads facing the interior of the container.
- Install fastener collars and secure them using a hydraulic, pneumatic, or manual tool. When properly installed, all fasteners should have the bolt heads inside and the collars on the outside of the container.
- Apply a bead of sealant along the top and sides of the ventilator flange, leaving the bottom unsealed for drainage
Installing a Narrow Ventilators
- Drill three 6 mm diameter attachment holes through the ventilator flange and the underlying panel, using the pilot hole and attachment location marks on the ventilator as a guide.
- Punch the centers for nine ventilations holes’ in the panel, then drill nine holes, each 10 mm in diameter, at the center punch marks.
- Insert and hammer in the three TIR-approved lock bolts into the attachment holes, with the bolt heads facing the interior of the container.
- Install fastener collars and secure them using a hydraulic, pneumatic, or manual tool. When properly installed, all fasteners should have the bolt heads inside and the collars on the outside of the container.
- Apply a bead of sealant along the top and sides of the ventilator flange, leaving the bottom unsealed for drainage
Remarks :- Before performing any ventilator repairs, ensure the underlying panel is free from damage, impact, or corrosion. If any issues are present, repair the side panel with the necessary actions before proceeding with ventilator installation or repair.
What is the Plug Weld
a plug weld is a technique used to join overlapping metal surfaces securely. For instance, when replacing parts like wide ventilators that may already have holes from previous installations, a plug weld is applied to fill those holes and firmly bond the replacement component to the container wall. This method ensures a solid, durable attachment without affecting the container’s exterior surface. Plug welds are valuable for container repairs and modifications, especially where access to only one side of the material is possible.
Tools and machines required for the installation of a plastic ventilator
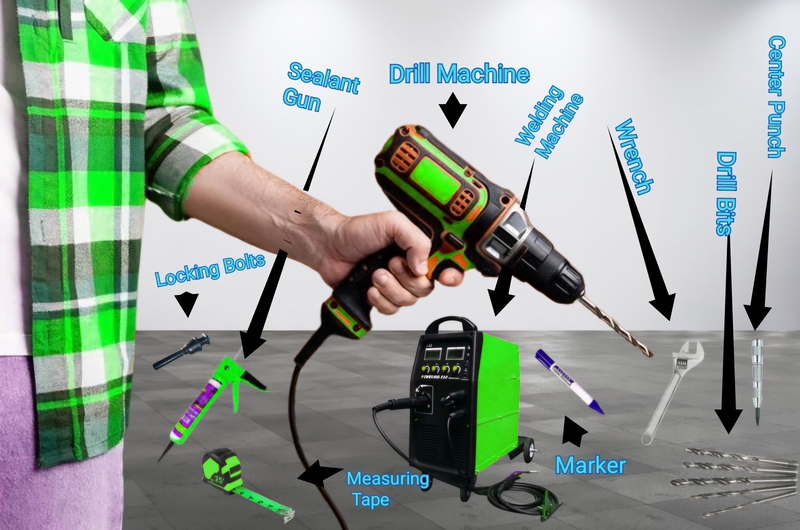
- Measuring Tape: For positioning the ventilator accurately (50 to 55 mm below the top rail).
- Marker: To mark the position of the attachment and ventilation holes.
- Plug Welding Tools: Welder (MIG/TIG/Stick), Welding Helmet and Gloves, Welding Rods/Wire:]
- Grinder: To smooth out any cut, burned areas, or plug welds.
- Drill and Drill Bits: Drill Machine, 10 mm (3/8 inch) Drill Bit, 6 mm (1/4 inch) Drill Bit
- Center Punch: To mark the centers of ventilation holes for precise drilling.
- Hammer: For setting center punch marks and inserting locking bolt pins.
- Locking Bolt Pins and TIR-Approved Lock Bolts: For securing the ventilator in place.
- Wrench or Socket Set: For tightening and securing locking bolts.
- Sealant and Applicator: Sealant Gun, Waterproof Sealant
What are TIR-Approved Fasteners for Ventilator Installation ?
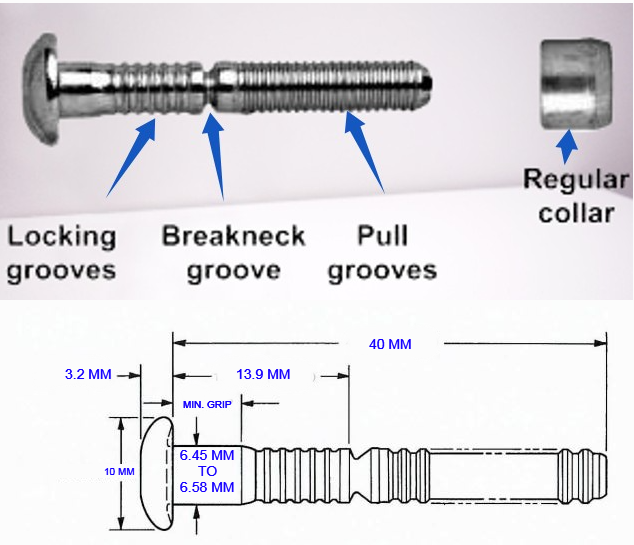
For ventilator installation, TIR-approved lock bolts are typically used, including the AVELOCK 2801-08-03 pin with the 2659-08 collar and the HUCKBOLT C6LB-C8-3 pin with the 3LC-I-8 collar. Equivalent fasteners that meet customs requirements for international transport under customs seal can be used if approved by the container owner.
These fasteners fit into a hole made by a 6 mm (1/4 in) diameter drill bit. Once placed, the fastener is initially set by tapping with a hammer, and the collar is securely fastened with a hydraulic, pneumatic, or manual tool.
What is the difference between Vented Container and Ventilated Container ?
Vented Container
A vented container is equipped with passive, non-mechanical vents, also referred to as ventilators, typically located near the upper part of the cargo space. These vents rely on natural airflow to allow air exchange between the container’s interior and exterior, helping to reduce condensation and moisture buildup without the need for additional equipment.
Ventilated Container
A ventilated container has a more advanced ventilation system, either through mechanical means (e.g., fans) or through passive vents positioned at both the upper and lower parts of the cargo space. This design enhances airflow and circulation within the container, improving moisture control and maintaining a stable environment for sensitive goods.
Difference
The main difference between vented and ventilated containers is the type and placement of the ventilation system. Vented containers rely solely on passive airflow with vents typically located at the top, while ventilated containers use either a mechanical system or a combination of upper and lower vents to ensure more comprehensive air circulation throughout the cargo area.
Louvered Vents and Turbine Vents for shipping containers
1. Louvered Vents (Louvered ventilators)
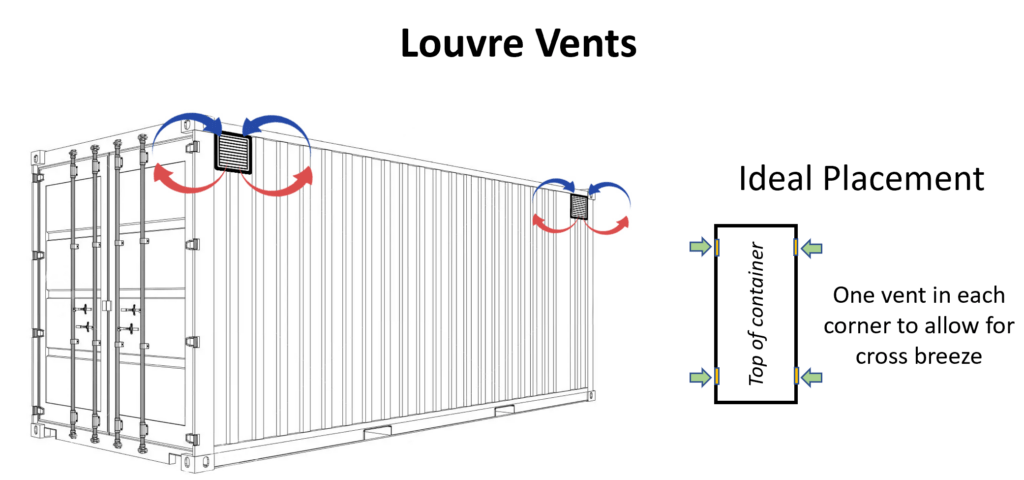
Louvered vents are a common ventilation solution for shipping containers, providing passive airflow while offering added protection against rain, dust, and other external elements. These vents have angled slats, or “louvers,” which allow air to circulate between the container’s interior and exterior. The slats are specially designed to deflect rain and block debris, making louvered vents suitable for containers exposed to challenging weather conditions. Positioned near the top of the side walls, louvered vents help control humidity and reduce condensation inside the container, protecting moisture-sensitive cargo from potential damage.
2. Turbine Vents (Turbine Ventilators)
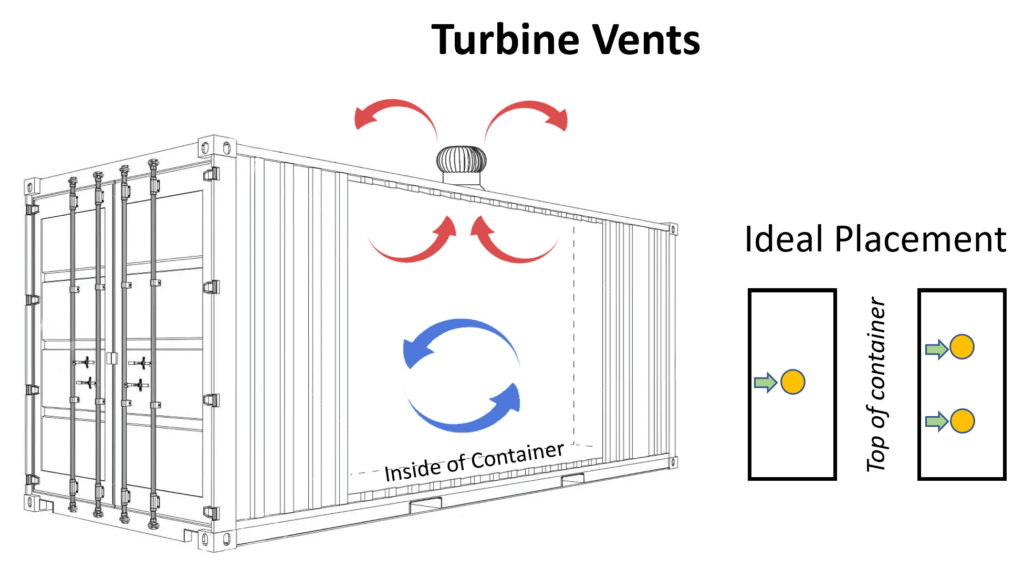
Turbine vents are active ventilators that operate using wind power to increase airflow in and out of the shipping container. The turbine is designed to spin with even slight air movement, creating a suction effect that pulls warm, humid air out of the container. This constant airflow helps reduce the buildup of heat and moisture, making turbine vents particularly effective in warm, humid climates. Turbine vents are often installed on the roof of the container for maximum efficiency. Since they rely on wind power and have no electrical components, they are a sustainable and low-maintenance solution for improving ventilation in containers holding sensitive or temperature-sensitive cargo.
Both vent types play crucial roles in maintaining an optimal internal environment for shipping containers but are suited to different conditions and ventilation needs.
Where else shipping container ventilators might be found ?
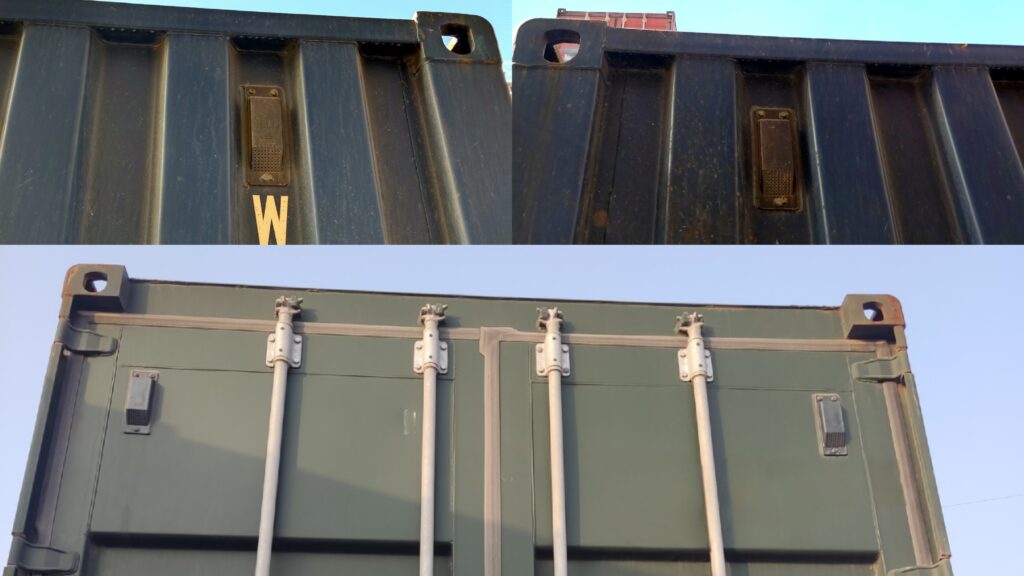
Most shipping container ventilators are generally placed on the right and left side panels to facilitate airflow. However, in some cases, ventilators may also be installed on the front or door panels, depending on the container’s design and the specific ventilation needs.
