

Table of Contents
Repairing the floors of shipping containers presents unique challenges, as most container components are made of steel, while the floorboards are predominantly wood. Traditionally, container floorboards were prone to issues such as burning, discoloration, and absorption of odors and stains. These problems were particularly common in older container models.
However, with the advancement of materials and technology, a variety of alternative floorboard options have emerged to address these issues, offering solutions for wood burns, discoloration, odor absorption, and staining. For more details on these alternatives, refer to the article titled “Shipping Container Plywood (Floorboard) You Must Know“
When it comes to repairing container floors, various methods can be employed, depending on the nature and extent of the damage. It’s essential to choose a repair technique that is both effective and economical to ensure long-term durability without unnecessary costs.
Shipping Container Floorboard Repair Methods
- Container Cleaning
- Container Dowel Repairs
- Container Floorboard Sectioning
- Complete Floorboard Replacement
- Use Wood Filler ( Not recommended IICL )
- Container Screws Refitting or Installing
- Container Floor Caulking / Floor Sealant
01. Container Cleaning
Ensuring the cleanliness of a shipping container begins with assessing the condition of the floor to determine the appropriate cleaning method. Corrective cleaning is essential for maintaining the longevity and usability of the container, especially when dealing with dirt, stains, or spills that can damage the floorboards.
In cases of contamination, particularly with hazardous substances, it’s crucial not to attempt cleaning until the contaminant has been properly identified. Only after receiving appropriate cleaning instructions and safety guidelines should the cleaning process begin. This ensures the safety of personnel and prevents further damage to the container.
Shipping Container Cleaning Methods
- Container Sweep Out
- Container Vacuum Clean or Air blow
- Container Water wash (Pressure Wash)
- Container Scraping or using sanding disk or wire brush
- Container Steam Clean
- Spread Solvents with a rag
02. Dowel Repairs
Dowel repair is a common technique used to fix damage, such as small holes, in the wooden flooring of shipping containers. For holes with a diameter of up to 22mm, a hardwood dowel is inserted into the hole and secured with a strong adhesive. Once the dowel is in place, it is trimmed to be flush with the surface of the floor and then smoothed to restore the floor’s original strength and usability. This method is highly effective in maintaining the structural integrity of the container’s floor, ensuring it remains safe and durable for continued use.
7 steps to repair a hole using dowel
- Assess the Damage: Inspect the hole or damaged area on the container floor to ensure it is suitable for dowel repair, typically when the hole is up to 22 mm in diameter.
- Prepare the Hole: Remove any debris, protruding nails, or other obstacles. Clean and round the edges of the hole to ensure a snug fit for the dowel.
- Cut the Dowel: Select a hardwood dowel of the appropriate diameter and cut it to match the thickness of the container floor, usually 28 mm.
- Apply Wood Glue: Use exterior-grade wood glue to coat both the inside of the hole and the dowel. This ensures a strong bond.
- Insert the Dowel: Carefully place the dowel into the hole. The fit should be tight to ensure stability, with the dowel flush with the surface of the floor.
- Trim and Smooth: Trim the dowel to make it even with the surrounding floor. Smooth out the edges to create a seamless repair.
- Allow to Dry: Let the glue dry completely before subjecting the container to regular use. This ensures the dowel is firmly in place and the repair is durable.
It’s important to note that the limitation for using dowels has been revised based on the guidelines from the IICL’s “Repair Manual For Steel Freight Containers” Fifth Edition, Section 9.3 on Dowel Repairs. According to these revised standards, dowels can be used for repairing holes up to 22 mm in diameter. For more detailed information, refer to the IICL Technical Bulletin, IICL TB 004, 1 November 2006 Title: “Revised Dowel Repair in Container Floors”.
Container Floor Repair: Guidelines and Limitations
Repairs that involve either a partial or full replacement of the floor are bound by the following conditions:
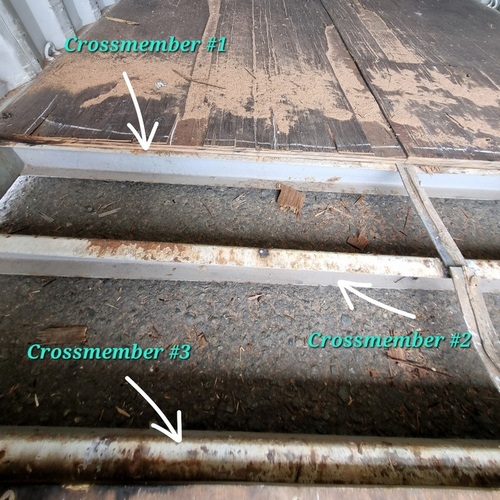
- The replacement plywood boards, along with any undamaged boards, must span across at least three crossmembers or the sides of forklift pockets.
- If during inspection it’s found that the floor has previously been repaired without following these rules, consult the owner to decide if a fix is necessary.
03. Container Floorboard Sectioning (Less-than-complete floorboard replacement)
11 Steps Process for Less-than-Complete Floorboard Replacement
Here is the 11-step process for shipping container floorboard sectioning, along with the tools, machines, and safety equipment required for the task.
Step 01 – Determine the area of the flooring to be removed and mark a line where the cut is to be made. Ensure the marking is accurate and straight to maintain the structural integrity of the remaining floor.
Tools and machines required: Measuring tape, marker or chalk.
Safety and PPE: None required.
Step 02 – Back out and remove the screws from the damaged section of the floor panel. This will make the panel easier to detach. If the screws are rusted or impossible to back out the screw heads may need to be burned off for removal.
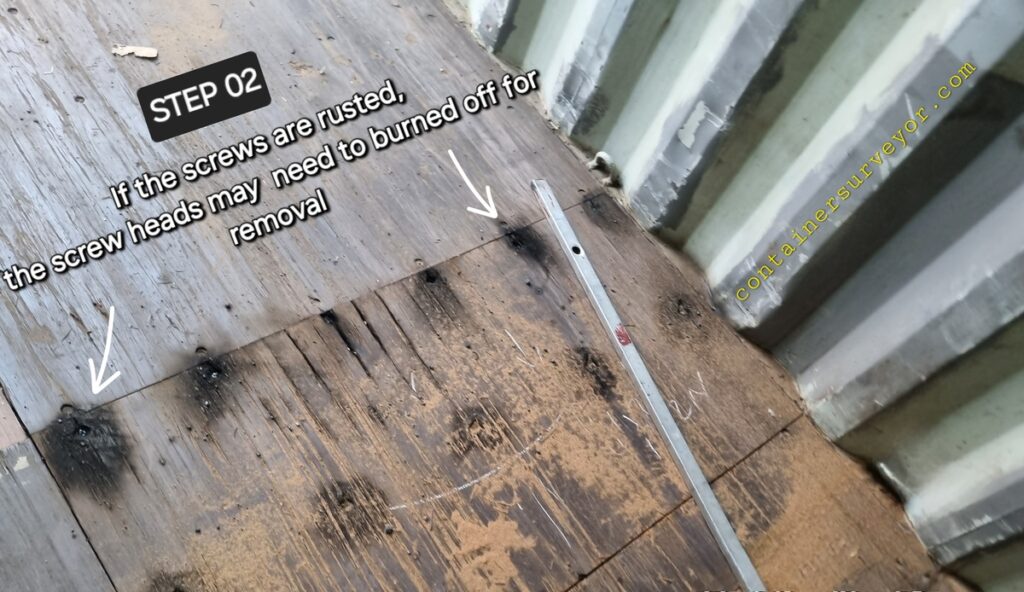
Tools and machines required: Gas Cutter with torch or power drill.
Safety and PPE: Gloves for hand protection.
Step 03 – Wedge up the floor panel above the cross-member to allow saw blade clearance. Take care not to damage surrounding panels while doing this.
Tools and machines required: Wedge or pry bar.
Safety and PPE: Gloves.
Step 04 – Set the rotary saw blade to panel depth and carefully cut the damaged panel. The cut must be made along the center line of a cross-member flange to ensure a clean removal of the damaged section.
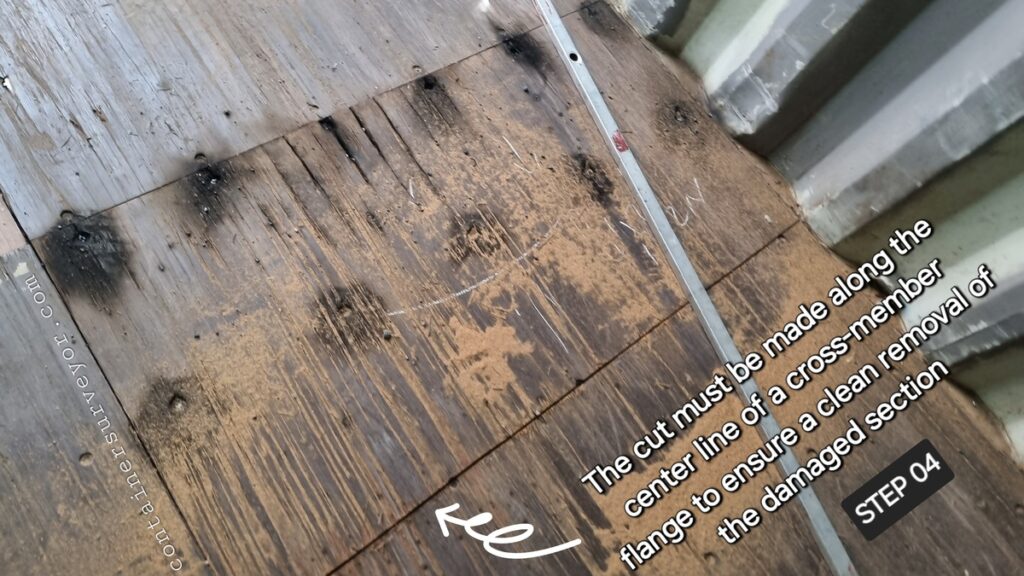
Tools and machines required: Rotary saw.
Safety and PPE: Safety goggles, dust mask or respirator, hearing protection, gloves.
Step 05 – Remove the damaged section and any old sealant from the exposed understructure. Also, remove any remaining screws from the area to prepare for the new panel.
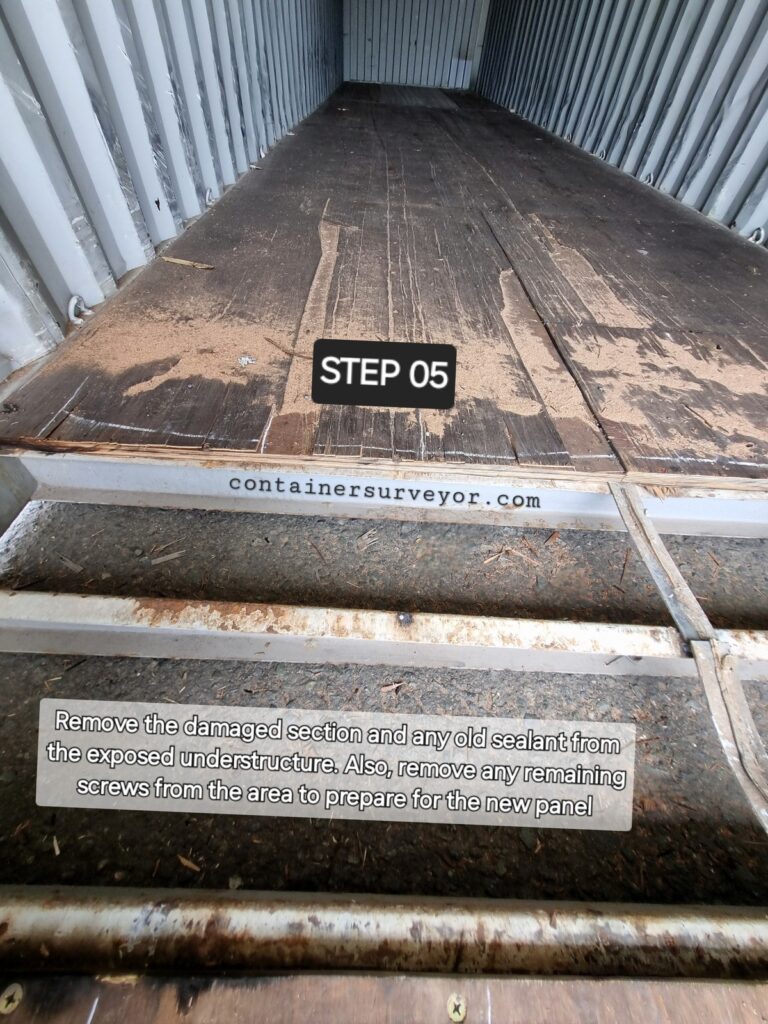
Tools and machines required: Screwdriver or power drill, vacuum or brush to clean.
Safety and PPE: Gloves, dust mask.
Step 06 – Measure and cut the replacement floorboard to the required size. Both side edges of the replacement panel must be shaped (notched) to fit properly with the center rail and bottom side rail.
Tools and machines required: Measuring tape, saw for notching.
Safety and PPE: Gloves, safety goggles.
Step 07 – Apply sealant to all mating surfaces and the underside of the replacement panel. This helps prevent moisture damage and improves the strength of the bond.
Tools and machines required: Sealant gun.
Safety and PPE: Gloves.
Step 08 – Fit the replacement panel section in place. The remaining panels and the replacement panel must be fitted together in such a way that “no gap” is visible between the old and new sections.
Tools and machines required: None required.
Safety and PPE: Gloves.
Step 09 – Drill new screw holes through the replacement panel and cross-member or fork-pocket. The new hole locations must be moved 13mm from the original holes to ensure a secure fit.
Tools and machines required: Power drill with bit set.
Safety and PPE: Gloves, safety goggles.
Step 10 – Install new screws and re-tighten them to secure the replacement panel.
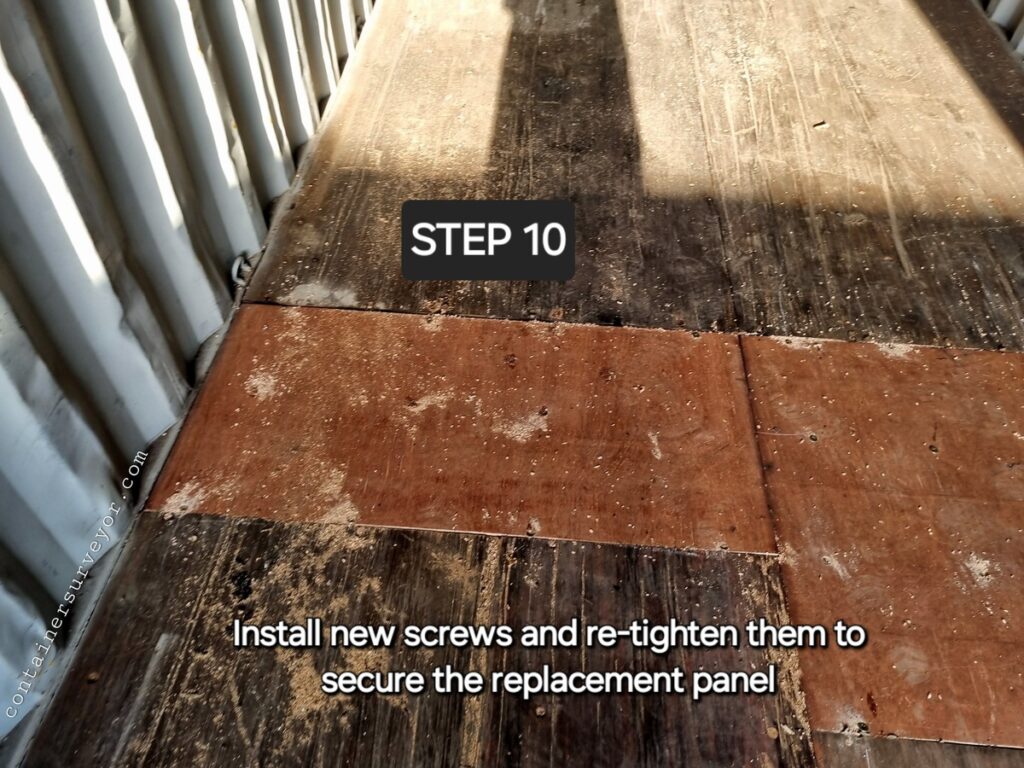
Tools and machines required: Power drill or screwdriver.
Safety and PPE: Gloves.
Step 11 – Apply sealant (do not use Butyl) to the exposed area between the board and the bottom rail to protect against moisture and ensure a tight seal.
Tools and machines required: Sealant gun.
Safety and PPE: Gloves.
Factors to Keep in Mind When Partially Replacing Plywood Floors
When replacing individual plywood panels, it’s important to note how the original boards were installed. The longest side of the panels could have been placed either along the length (longitudinally) or across the width (transversely) of the container. In modern designs, floorboards are generally installed lengthwise (longitudinally), with a steel center support running down the middle of the container. This support usually has a hat-section or flat-bar profile that holds the edges of the floorboards in place.
Complete Floorboard Replacement
Complete Floor Panel Replacement Process
- Remove Damaged Panel: Begin by backing out the screws securing the damaged floor panel. If screws are rusted or cannot be removed, burn off the screw heads to facilitate removal.
- Extract Damaged Floor Board: Carefully remove the damaged floorboard, ensuring not to damage the adjacent components in the process.
- Clean Up Surface: Remove the old sealant from the side bottom rails, center support rail, and cross-members. It’s important to thoroughly clean these surfaces to allow proper adhesion of the new sealant.
- Prepare Replacement Panel: Measure and cut the new floorboard to fit the space left by the damaged board. The replacement floorboard should be coated with a polyurethane layer for protection. Both edges of the new panel must be notched to fit securely with the center rail and bottom side rails.
- Seal and Install: Apply sealant to all mating surfaces and the underside of the replacement panel. This ensures that the panel is sealed properly against moisture and other elements.
- Fit the Replacement Panel: Position the new panel in place, ensuring that it fits snugly with the remaining boards. There should be no visible gaps between the new and old panels.
- Drill New Screw Holes: Drill new screw holes through the replacement panel and into the cross-members or fork pocket. Shift the holes 13mm from the original holes to maintain structural integrity.
- Secure the Panel: Insert and tighten the screws to firmly secure the replacement floor panel.
- Apply Sealant to Exposed Areas: Apply a non-butyl sealant to the joints between the new panel, the adjacent boards, and the bottom rails, ensuring a strong, watertight seal.
When repairing plywood floors, keep the following points in mind:
- Replacement plywood panels should stretch from the side bottom rail to the steel center support, and if necessary, a center support must be added.
- For boards installed across the width (transversely), replacement sections should match the width of the original board.
- Boards placed lengthwise (longitudinally) must be cut so that the joints with the existing boards align over the center of a crossmember, forklift pocket side, or outrigger, depending on what’s needed.
- If the entire original board isn’t damaged, the size of the damage and the remaining intact section will determine how much needs replacing. In some cases, the replacement may cover as few as three crossmembers.
Use Wood Filler or Wood Putty for Container Floor Repairs
When and Where to Use Wood Filler or Wood Putty : Wood filler is used to repair minor surface damage like cracks, dents, or small gouges in shipping container floorboards. It’s not suitable for large structural damage but works well for cosmetic fixes and preventing further wear. You would apply wood filler in situations where the damage is not deep enough to require full panel replacement, but leaving it untreated could lead to water penetration or further deterioration.
This method is not recommended by The Institute of International Container Lessors (IICL)
Steps to Use Wood Filler or Wood Putty for Shipping Container Floorboards
- Inspect the Damage: Identify areas on the floorboard where the damage is superficial—like small cracks, splits, or gouges. Make sure the damage doesn’t go through the full thickness of the board, as that would require more extensive repair.
- Clean the Area: Before applying wood filler, clean the damaged area thoroughly. Remove any dirt, debris, or loose wood fibers. For best results, lightly sand around the damaged area to ensure the filler bonds well.
- Mix the Wood Filler: Depending on the product you’re using, you may need to mix the filler. Some fillers come ready to use, while others require blending with a hardener. Follow the manufacturer’s instructions to ensure the filler cures properly.
- Apply the Filler: Using a putty knife, press the wood filler into the damaged area. Make sure to overfill the hole slightly, as the filler may shrink as it dries. Smooth the surface to match the surrounding area as closely as possible.
- Allow the Filler to Dry: Let the filler dry completely. This can take anywhere from 30 minutes to several hours, depending on the product used. Check the manufacturer’s recommendations for exact drying times.
- Sand the Surface: Once the filler has dried, sand the repaired area until it’s smooth and level with the surrounding floorboard. Use medium-grit sandpaper to remove excess filler and then finish with a finer grit for a polished look.
- Seal the Area: After sanding, apply a sealant to the repaired area to protect it from moisture and wear. Make sure the sealant is compatible with the floorboard’s existing coating or finish, typically polyurethane.
- Final Inspection: Ensure the repair is seamless and well-protected. The floorboard should now look uniform, and the repaired area should be strong enough to withstand foot traffic or any equipment placed on it.
This is how to apply wood putty in container flooring.
Container Floor Screws Refitting & Floor Screws Installing
When maintaining shipping containers, loose or missing screws in the floor can lead to significant issues, from instability to potential damage to cargo. To ensure the flooring remains secure and functional, addressing loose or missing screws promptly is crucial. Below, we will explore the two main methods: screw refit and screw reinstall.
Shipping Container Floor Screw Refit
Refitting screws is the process of tightening or repositioning the existing screws that may have become loose over time due to wear, vibrations, or load shifts. Here are the steps for performing a screw refit;
Step 1: Inspect the Floorboard and Screws
Begin by visually inspecting the floorboards and the screws holding them in place. Look for any loose screws that may be protruding or partially unscrewed. Check if the screw holes have become enlarged or if the screws show signs of rust or corrosion.
Step 2: Tighten the Screws
Using the appropriate screwdriver or power drill, tighten the screws that have loosened. Ensure they are securely fastened without over-tightening, as this could damage the wood or strip the screw hole. If the screw doesn’t catch well, it could mean the screw hole has become worn out, in which case you may need to consider reinstalling the screw with a new one.
Step 3: Re-check the Stability
After tightening, test the floorboards by applying pressure and checking for any movement or give. If the boards remain loose, proceed to the screw reinstall method.
Shipping Container Floor Screw Reinstall
Reinstalling container floor screws involves replacing damaged, corroded, or missing screws. This method is essential when the existing screws no longer provide a secure hold. Here are the steps for reinstalling screws;

Step 1: Remove Damaged or Loose Screws
Begin by unscrewing and removing any damaged, rusted, or missing screws from the floorboards. Ensure that all old screws are fully removed to allow for a clean installation.
Step 2: Clean and Prepare the Screw Holes
Inspect the screw holes for any debris, corrosion, or damage. If the holes are stripped or enlarged, you may need to fill them with wood filler or epoxy to create a solid surface for the new screw.
Step 3: Install New Screws
Select new screws of the appropriate size and material (rust-resistant screws are ideal for shipping container repairs). Insert the new screws into the prepared holes and tighten them securely into place. If the screw hole was filled, allow adequate time for the filler to cure before installing the screw.
Step 4: Re-check and Test the Floor
After installing the new screws, apply pressure to the floorboards to ensure they are securely in place. If there is no movement or instability, the floor is properly secured.
Container Floor Caulking / Floor Sealant
Applying Floor Caulking/Sealant for Shipping Container Floorboards
When and Where to Use: Shipping Container Floor caulking or sealant is used to fill gaps between floorboards, container bottom side rails, tunnel bolster, tunnel plate or front and rear rails. (adjacent components of floorboard) It’s essential for preventing water, dirt, and pests from entering through small openings in the container floor. You should apply caulking after floorboard repairs, replacements, or whenever gaps appear between boards due to wear or environmental exposure.
Steps for Applying Container Floor Caulking/Sealant
- Inspect the Gaps: Identify any gaps or seams between the floorboards and container’s side rails, cross-members, or between individual boards. These are the areas that need sealing to prevent moisture and debris infiltration.
- Clean the Surface: Ensure the area where you’ll be applying the sealant is clean and free of dirt, dust, and old sealant residue. This allows the new sealant to adhere properly.
- Select the Right Sealant: Use a high-quality, non-butyl sealant designed for container floors. It should be durable, flexible, and resistant to moisture, temperature fluctuations, and chemicals.
- Apply the Sealant: Using a caulking gun, apply an even bead of sealant along the gaps between the floorboards and the container’s structural components. Ensure the sealant fills the gaps completely, without leaving voids.
- Smooth the Sealant: Use a putty knife or your finger to smooth out the sealant, ensuring it is evenly distributed and well-sealed along the seams. This also ensures the sealant penetrates deep into the gaps.
- Allow to Cure: Let the sealant cure according to the manufacturer’s instructions. This may take several hours depending on the type of sealant used and environmental conditions.
- Final Inspection: Once the sealant has dried, inspect the floor for any remaining gaps or weak spots. Ensure that the sealant has created a tight, waterproof seal across all treated areas.
